Hello, 2022!
It's a new year, and a new recipe book for the Cake Slice Bakers! I loved baking through Little Everday Cakes...but small, simple cakes are SO 2021.
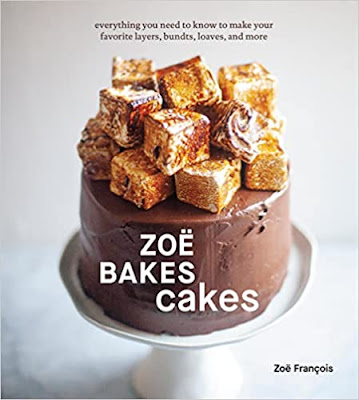
In 2022, insta-worthy cakes are all the rage! We are baking out of Zoe Bakes Cakes by Zoe Francois.
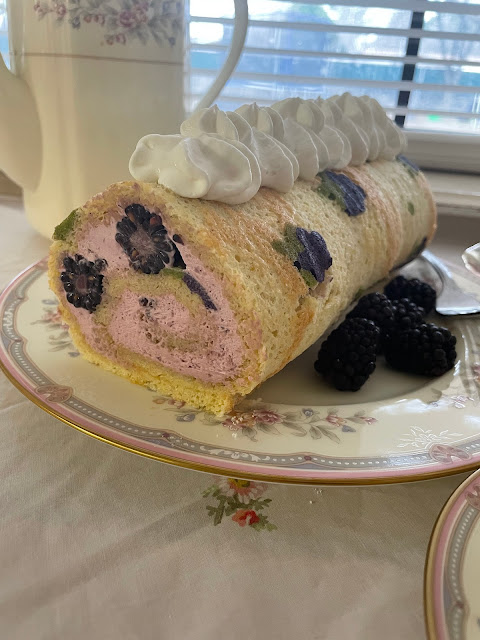
For my first bake, I chose this almond sponge cake called a Joconde. To see what the other bakers chose, check out the links at the bottom of this post!
Joconde cakes are pretty much the Legos of the pastry world. Generally, they aren't just a stand-alone cake — they are a part of something. A canvas, so to speak!
Gorgeous opera cakes.
Fancy Swiss rolls.
Layers in entremets.
Ooo la la.
The book describes this Joconde as "nutty and rich, but still light."
Accurate.
All the cake choices for our inaugural 2022 bake were tempting.
But the thing that sold me on this one was a little factoid: the Joconde cake is named after Da Vinci's model for the Mona Lisa, Lisa Goconde. (The French version of her name starts with a "j").
As a lover of random information, how could I not try it out after learning that?
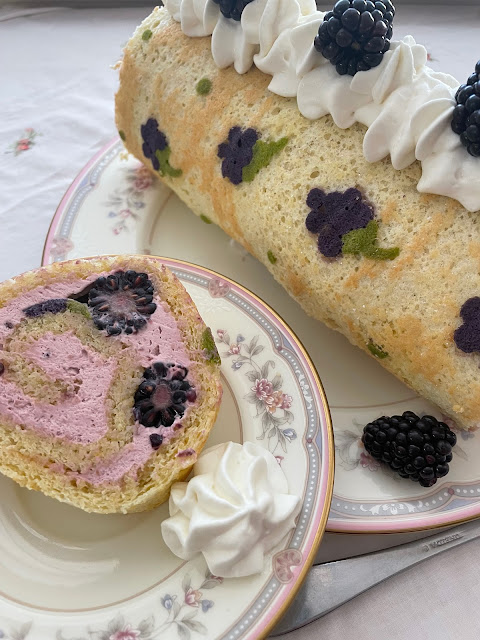
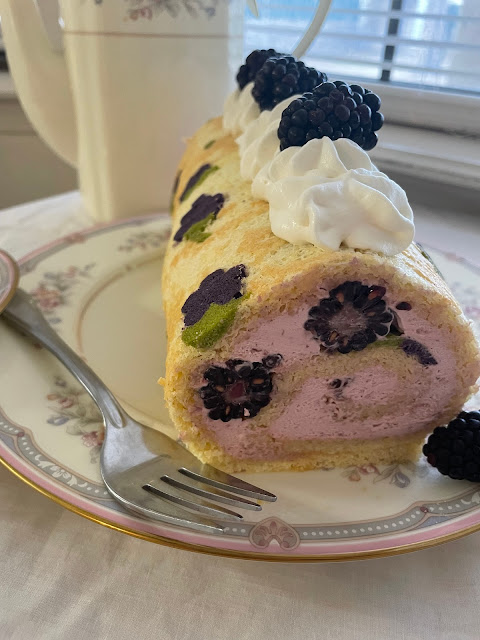
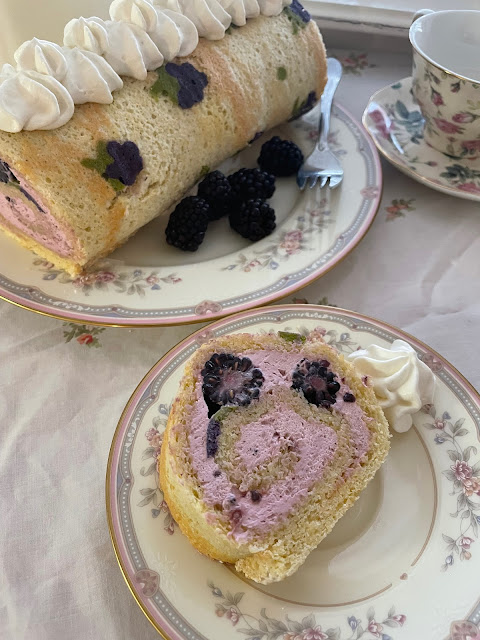
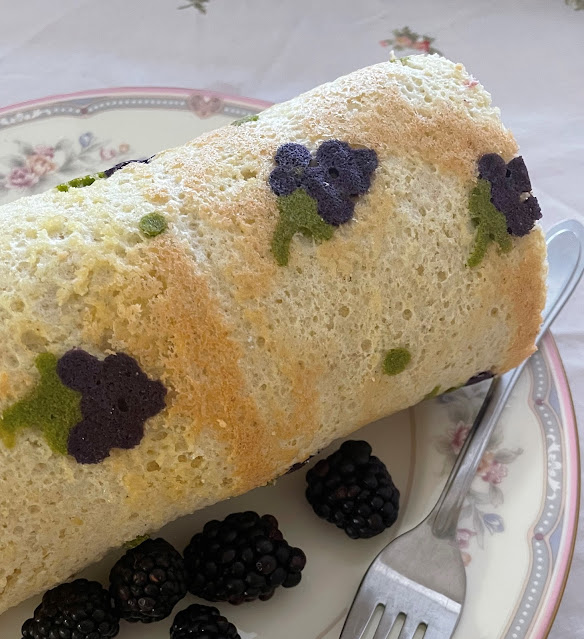
Since it's named after the inspiration behind a painting, I decided to add some designs on the outside. I considered doing an elaborate piece of edible art — and I will in the future! But this time, I stuck to a simple pattern to show the flavors inside. I used this tutorial from Sugar Geeks to make the inlaid design.
Basically, you just color some batter, pipe a design on parchment, freeze it for a little bit, and then spread the sponge cake batter over it with an offset spatula. It's really pretty easy, but you can get super elaborate and detailed. (Look up patterned Swiss roll cakes. People are amazing.)
Pretty, huh?
The cookbook author recommended filling the Joconde with whipped cream and berries. One of the options for whipped cream she listed was a "jammy" version. Since I had a jar of blackberry preserves in the fridge, I chose that variation.
It was light as air, sweet but not too sweet (like the Mona Lisa's smile), and an overall successful first bake!
I'm so excited for what 2022 holds for life, and I'm looking forward with hope. If this Joconde is any indication...it's gonna be a great year ;)
Joconde (Almond Sponge Cake)
From Zoe Bakes Cakes by Zoe Francois
3 T all-purpose flour
1 cup almond flour
3 whole eggs, room temp
1/2 cup sugar
3 egg whites
2 T sugar (used with the separated egg whites)
pinch of salt
powdered sugar
Whipped cream:
-2 cups heavy cream
-2 T powdered sugar
-1 tsp vanilla
-1/2 cup jam (optional)
-1 drop of burgundy gel food color (it looked kind of gray without it)
-3-4 cups fresh berries of your choice (I used blackberries)
1. Heat the oven to 350. Grease an 11x16 jellyroll pan, line with parchment, and grease the parchment (if you are doing a pattern, blot away any pooled oil so it doesn't mess up your design).
2. Sift the flour and almond flour together and set aside.
3. In a stand mixer with a whisk attachment, whip the whole eggs and 1/2 cup sugar on high speed for 6-8 minutes. The batter should be very light and fluffy, and should form a ribbon that sits on the surface of the batter for a few seconds before melding back into the rest. When the ribbon stage has been achieved, whip for one more minute, and fold in the almond flour mixture in three additions.
4. Using a clean mixing bowl and clean whisk attachment, whip the egg whites and salt together on medium speed until they start to get foamy. Slowly sprinkle in the 2 T sugar to create a meringue. Whip on high until glossy, stiff peaks form (1-2 minutes). Gently fold the meringue into the almond flour batter.
5. Pour the batter into the greased pan and spread evenly with an offset spatula.
6. Bake until the cake is just set and golden on top, 12-15 minutes (mine took 11). Cool the cake completely in the pan.
7. Whip the heavy cream, powdered sugar, vanilla, and jam together on medium speed until the whisk begins to leave lines. Finish whisking by hand so that you don't end up with butter. (Or make whipped cream however you like, those are just the directions in the cookbook).
8. Dust a clean kitchen towel with powdered sugar, and turn the cake out upside down on to the towel. Carefully remove parchment. (If you are doing a patterned cake, you'll have to flip the cake back over so that the pattern is on the bottom).
9. Spread 1/2 of the whipped cream over the Joconde, and dot with berries. Roll as tightly as possible, starting at the short end. Transfer to a serving tray, cover with plastic, and refrigerate for 1 hour.
10. Remove the roll from the fridge, top with remaining whipped cream, and decorate with berries as desired.
Enjoy;)
Each month The Cake Slice Bakers are offered a selection of cakes from the current book we are baking through. This year it is
Zoë Bakes Cakes by Zoē François. We each choose one cake to bake, and then on the 20th - never before - we all post about our cake on our blogs. There are a few rules that we follow, but the most important ones are to have fun and enjoy baking & eating cakes!
Follow our
Facebook,
Instagram, and
Pinterest pages where you can find all of our cakes, as well as inspiration for many other cakes. You can also click on the links below to take you to each of our cakes. If you have a blog and are interested in joining The Cake Slice Bakers and baking along with us, please send an email to thecakeslicebakers at gmail dot com for more details.
The Cake Slice Bakers also have a new Facebook group called
The Cake Slice Bakers and Friends. This group is perfect for those who do not have a blog but want to join in the fun and bake through this book.
It is a new year and a new book -
Zoë Bakes Cakes - and our choices for January 2022 were ~
Coconut-Candy Bar Cake
Joconde (Almond Sponge Cake)


That inlaid design is amazing. Wow. Just wow!!! That looks so good! Beautiful icing too!
ReplyDeleteThank you, Karen! It was fun to make!
DeleteHoly Cow. How gorgeous!!! You put my cake to shame.
ReplyDeleteAww, thank you Wendy! I was really surprised at how easy it was to inlay a design—it’s a “lot of bang for your buck” kind of technique.
DeleteAt least you have photos of your art for posterity! It's beautiful and looks delicious.
ReplyDeleteHaha, thanks Susan! I have to work quickly to get photo evidence before my kids get to it!
DeleteYou had me at "cake"!
ReplyDeleteHaha, thanks Mark!
DeleteYour cake is beautiful and sounds divine.
ReplyDeleteThank you, Kim ☺️
DeleteYour cake is so pretty - thanks for the tutorial link.
ReplyDelete